::Best Band Ever::
June 12, 2007 at 7:04 am 116 comments
Headband that is. (I’m still working on the Bagsket tutorial…that thing is a beast. So here’s a quick something to tide you over.)

I’m seeing more and more headbands pop up so I decided to take a swing at it myself. I went through at least 20 prototypes before I finally nailed it. These fit perfectly! There’s a WIDE and a NARROW version. The WIDE version has an extreme taper so that you get the full pattern blast at the crown of your head, but it still fits comfortably behind your ears. The NARROW version is simple and easy to make and tapers nicely too.
Want to make your own? Read the full post for the tutorial.
Headband Tutorial
Materials:
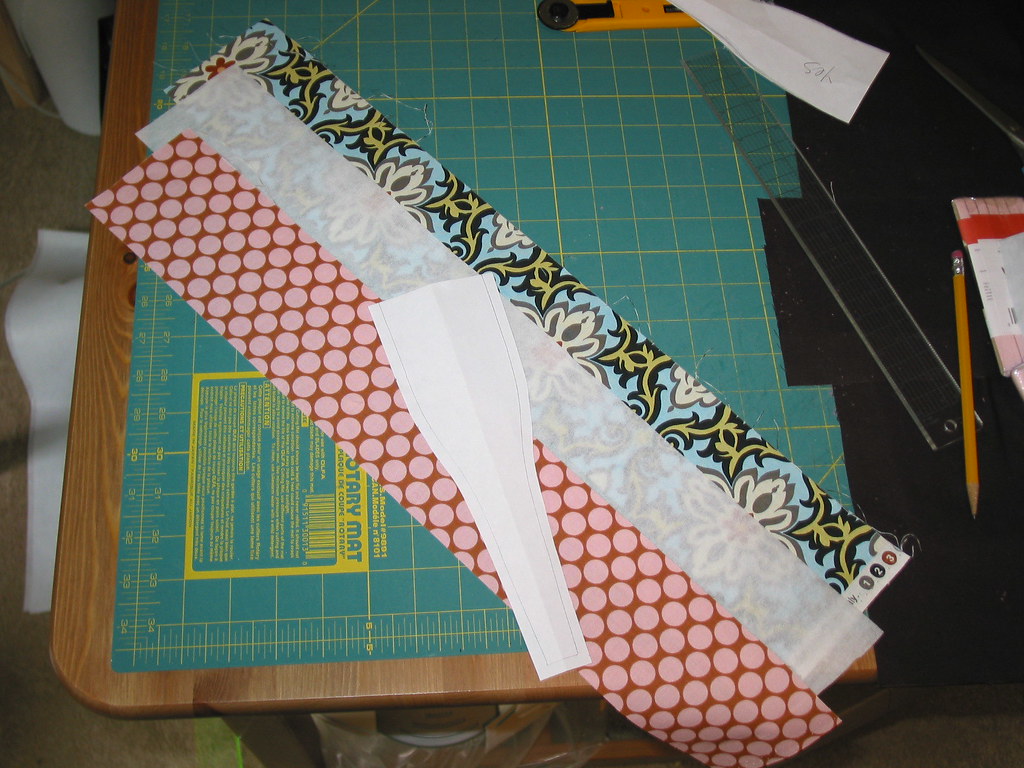
- Templates: Headband Tutorial Template Cut out the one (wide or narrow) you want
- 4 inch piece of braided elastic (it’s better than the woven elastic)
- 2 x [4″ x 20″] strips of fabric that you love. Use different fabrics so you have a reversible headband
- 1 x [4″ x 20″] strip of moderately stiff single-sided fusible interfacing (I tried Timtex – it was too heavy)
- Pins, Iron, Sewing Machine, Coordinating Thread, Blah blah blah
Notes:
- These headbands fit most women’s heads. If you have a smaller head, use 1 inch less elastic.
- Templates include the necessary seam allowances
- I used 100% cotton on my bands, but you could use any ironable fabric you like. I would LOVE to see what you make.
- Stitching the elastic in can be a bit of a bear if your feed dogs don’t catch. Just use the tip of your seam ripper or something pointy and firm to help “guide” the ends under the needle.
- The interfacing is optional. It adds a nice stiffness and shape to the headband, but I made a few without any interfacing and they worked perfectly too.
- I am not a seamstress by any means. My “templates” are pretty amateurish but they work for me and I’ve used them at least 10 times now so I think they’re solid. But consider yourself warned.
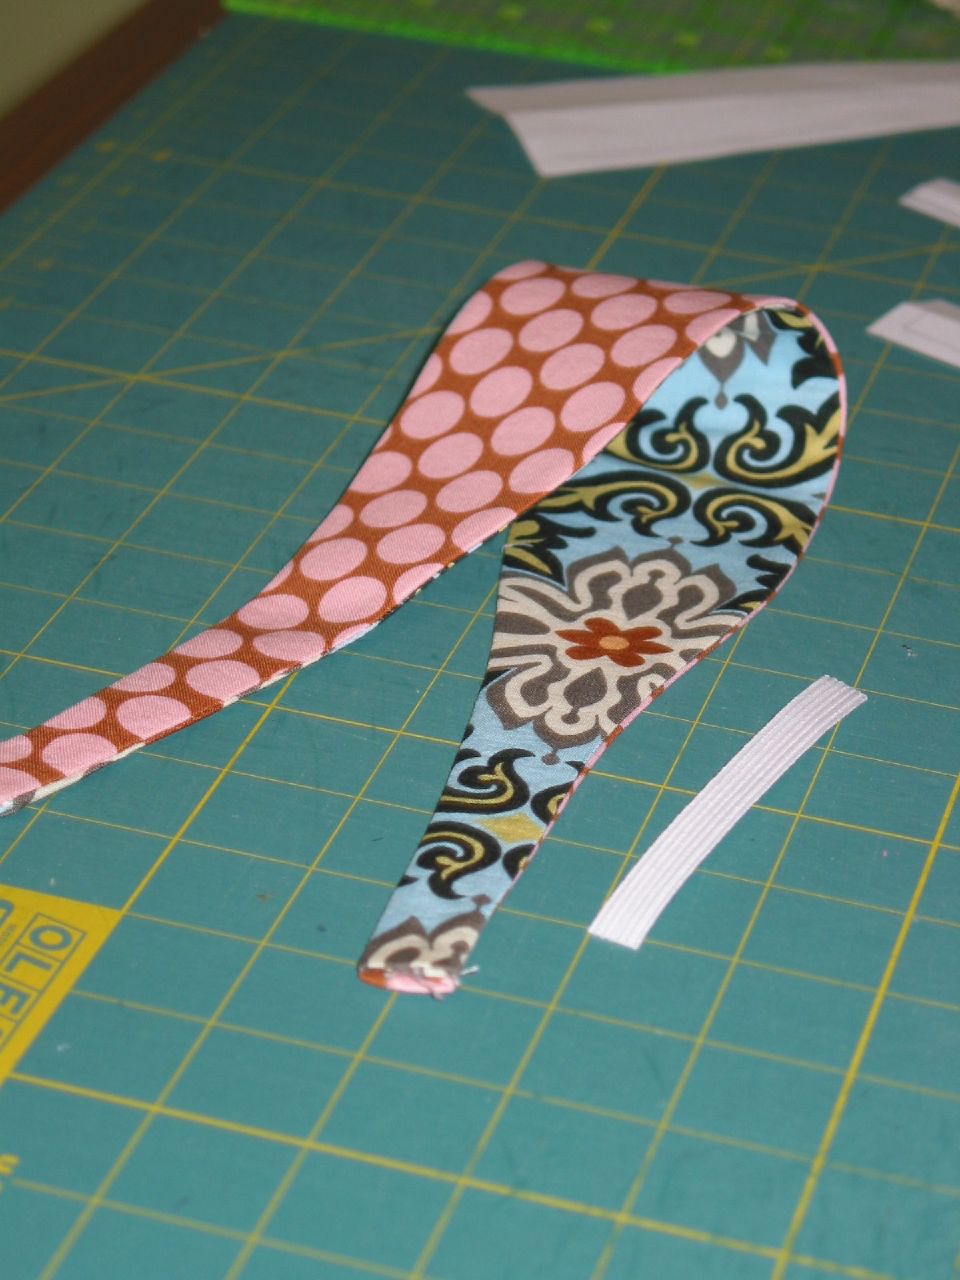
Step 1: Gather your materials kids!
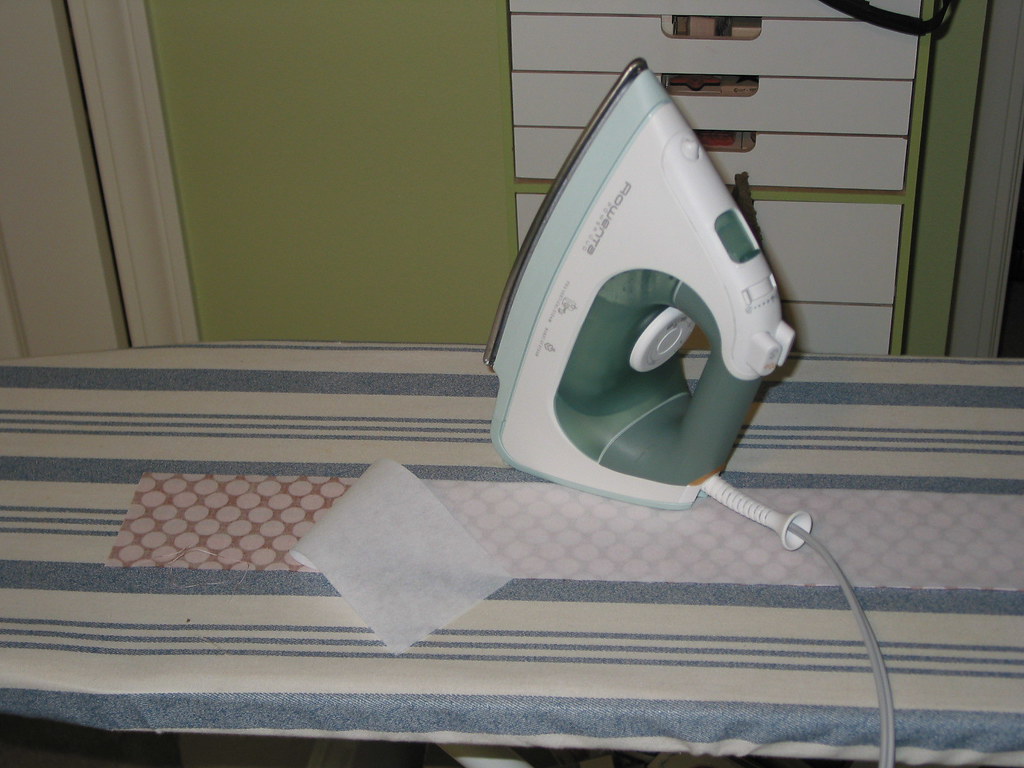
Step 2: Following the manufacturer’s instructions, fuse one strip of fabric (wrong side facing) to the interfacing
Step 3: Fold your strips lengthwise and align the “fold” end of the template on the fold of the strip. Trace and cut or pin and cut both strips. The templates include the necessary seam allowance.

Step 4: Fold down each end of both fabric strips (along the “crease” line on the template) and iron.

Step 5: With right sides facing, pin the strips together and sew along each LONG side using a 1/4″ seam allowance. Do not sew the short ends together. Make sure to reinforce at the beginning and end of each side and take care when you turn the curve when using the wide template. I find keeping the interfaced fabric on top makes the sewing go easier. 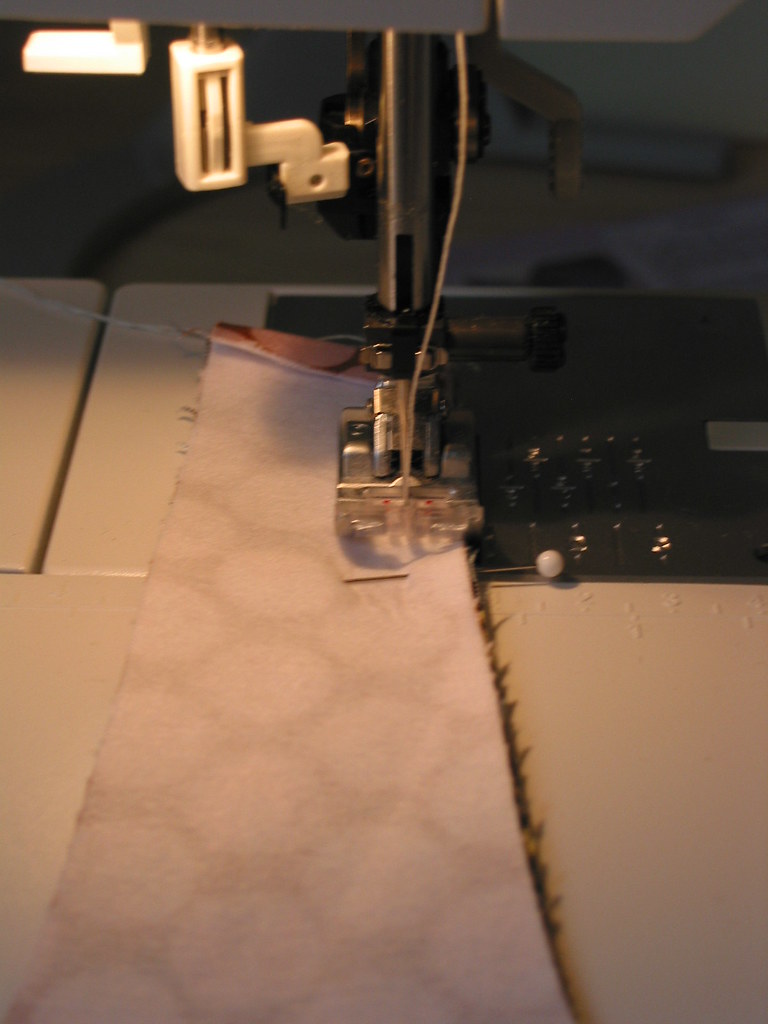
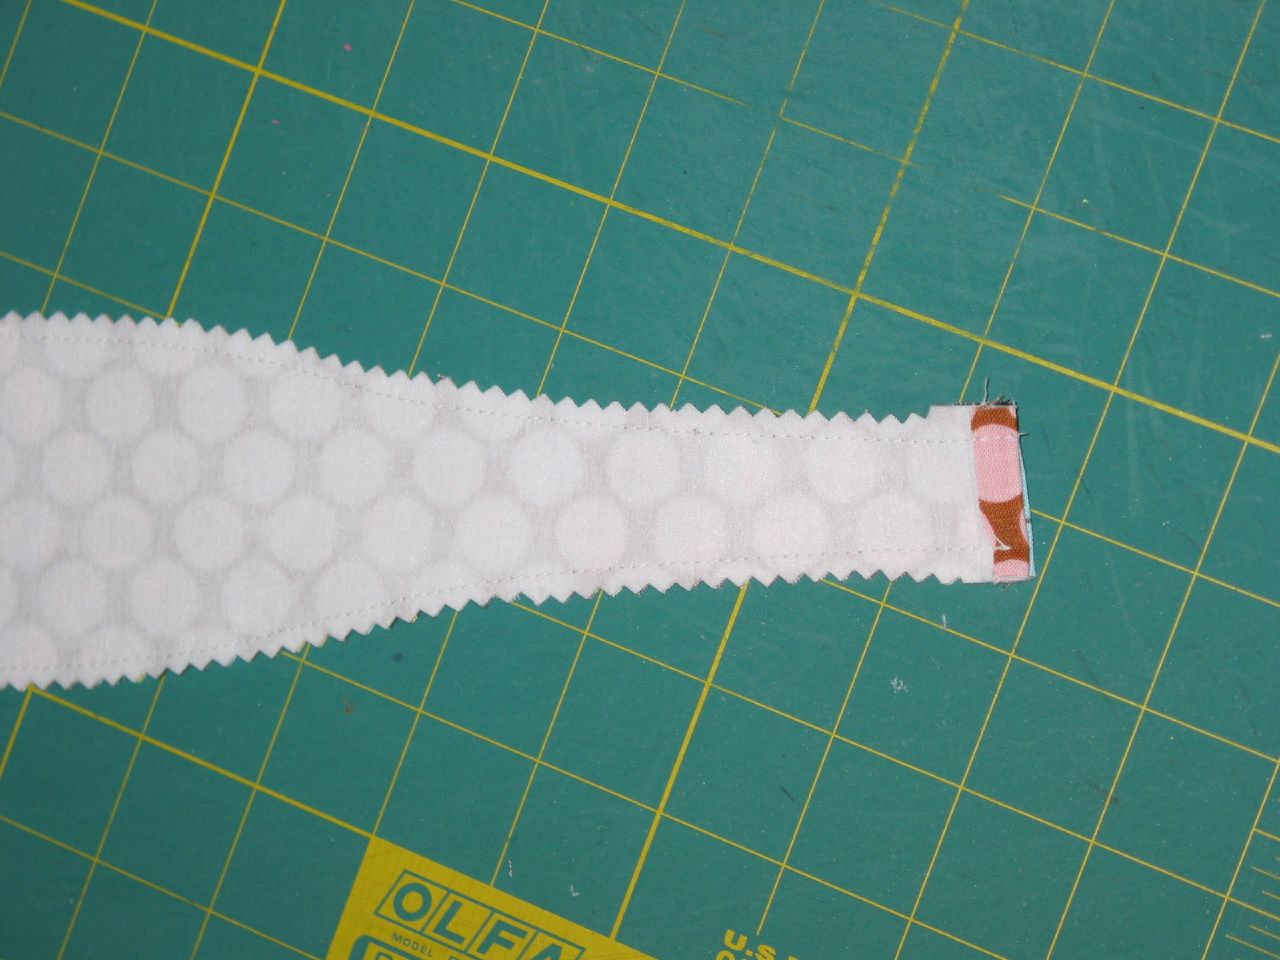
Step 6: To reduce bulk, pink along each side taking care not to cut into your seam. Pink up to but not along the short ends. Alternatively, you can can trim the seam allowance to 1/8 inch (don’t cut into the seam itself).
Step 7: Turn your tube inside out and iron flat. The turning is the hardest part of the whole thing. Use a large safety pin to catch the end of the interfaced fabric (don’t go through both layers). Use that pin to help turn the tube rightside out. Take your time…it’s worth it.
Step 8: Stitch along the side of the headband using a 1/8″ seam allowance (or whatever you think looks pretty). When you reach one short end, tuck one end of the elastic about 1/2″ up into one end of the tube. As close to the end of the tube as possible, sew along the end to secure the elastic. Backstitch and then forward stitch to reinforce this join. Continue down the other side of the headband.
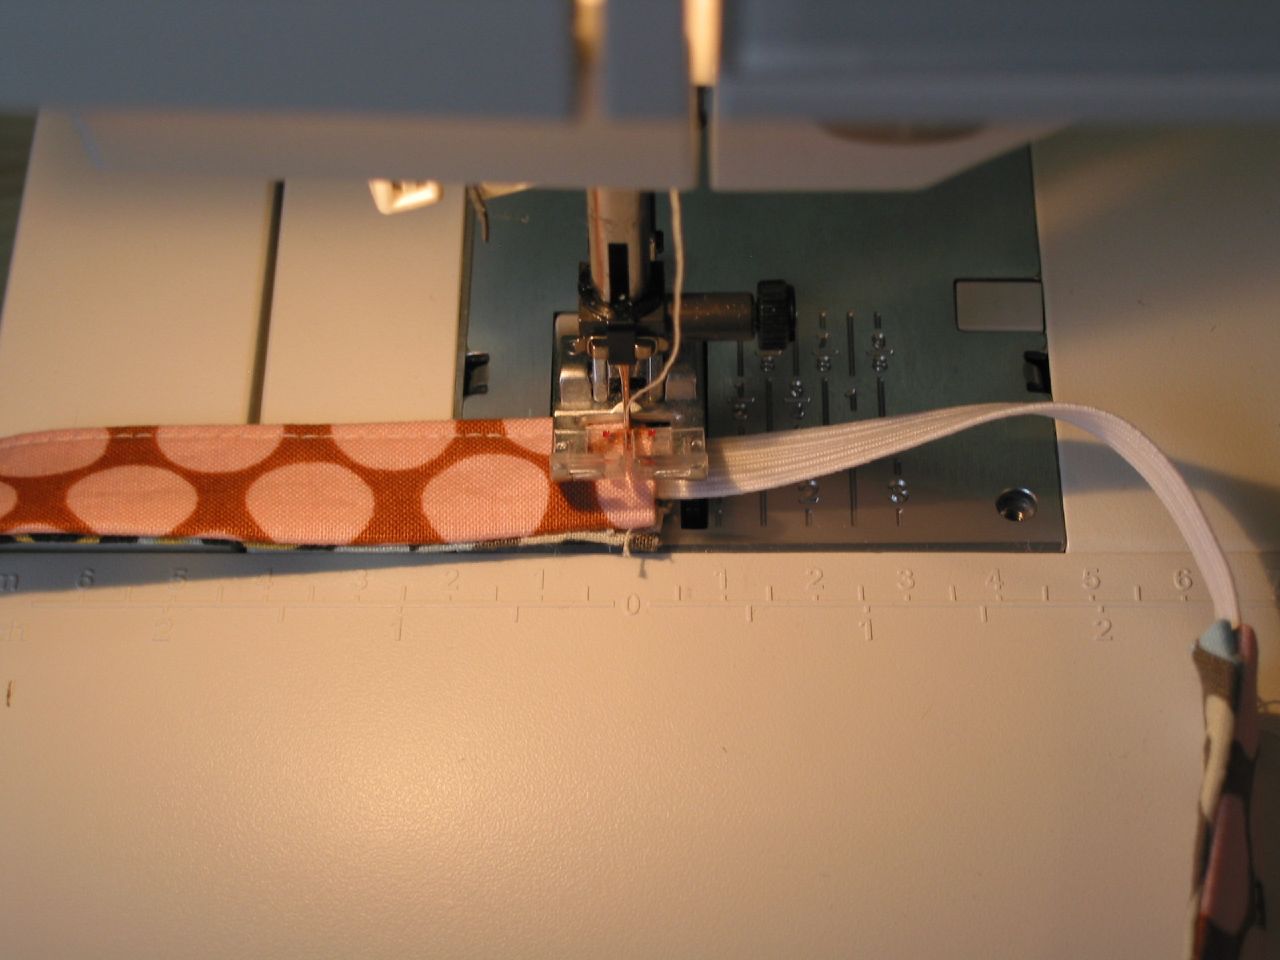
Step 9: When you reach the other end, tuck the other end of the elastic into the end of the headband and sew as you did on the other end. Make sure you didn’t “twist” your headband and that the elastic and headband form a nice smooth continuous circle. Reinforce the elastic join at this end too.

Ta-da! A completely reversible, comfortable and secure headband.


Let me know if anything is unclear or if you run into any issues. Cheers! -Suzanne
116 Comments Add your own
Leave a reply to santa’s crafty little helper « ninijeanie Cancel reply
Trackback this post | Subscribe to the comments via RSS Feed

1. Amy | June 12, 2007 at 6:08 pm
Awsome, now I can go make a ton more of these. I’m wearing the prototype one I snagged from you last Wed right now and it rocks. 🙂
2. Diana | June 12, 2007 at 7:01 pm
I work mine yesterday all day 🙂 Great work!
3. l3ahkn1ts | June 12, 2007 at 8:57 pm
Can I be the tester/ guinea pig?! That would be perfect for summer instead of the Calorimetries. or heck, i’ll just buy one from you. can you bring one to try tomorrow?
4. Andrea | June 26, 2007 at 6:44 pm
Great tutorial. It’s just what I was looking for and I’m going to try this out now.
5. stephen trick | June 27, 2007 at 6:58 pm
i’m interestd in buying a few headbands do you know of any places on line that sell these.many thanks stephen
6. eliza | June 28, 2007 at 11:26 pm
awesome — my roommate asked for headbands and i am definitely going to use your pattern! thanks for sharing.
7. fireflylane | July 6, 2007 at 3:43 am
thank you so much i can’t wait to try this out
Julie
8. Sew? « Earthwhisper Fiber Arts | July 6, 2007 at 10:33 pm
[…] bags to line. I have a pocket to fix on Tony’s shorts. I might even see if I can make one of these or these or […]
9. Susan Pettit | August 31, 2007 at 7:48 pm
I am trying to use your template for the headband. And when I cut my fabric you said cut 20 inches long. which I did but when I use your emplate and I fold my fabiric it’s to short. Should I enlage your template to make my headband longer
10. Giabella Designs | September 27, 2007 at 11:56 am
I tried you tutorial last night. It didn’t turn out bad but it didn’t look quite like your. What did I do wrong. It took me a whol hour to turn my fabric. Should I have put lining on both pieces?
11. Starbody » Blog Archive » Ubiquitous Sunday Post - The Spookiness | November 18, 2007 at 8:59 pm
[…] speaking of the friend. She is a master crafter and has really nice instructions for making a lovely little headband that seems like a nice Sunday project. I’ll be after her for help with my elusive […]
12. Sew,Mama,Sew! Blog » » November 22 ~ Fun for Hair | November 22, 2007 at 3:08 pm
[…] Band Ever Suzanne’s Best Band Ever Tutorial on her blog, foofanagle, has two versions and a template to […]
13. Jenny | November 27, 2007 at 6:49 pm
Trying this out and it’s turning out great! What width of elastic did you use? That’s the only measurement I can’t seem to find… Thanks, I’ll post a photo when it’s all done!
Jenny
14. santa’s crafty little helper « ninijeanie | November 27, 2007 at 10:02 pm
[…] headbands and ribbon headbands -cause my head is bigger than average and I will have to make my own to size so I can actually wear them with out a super-headache […]
15. Kristie | November 28, 2007 at 4:58 pm
Suzanne, I LOVE the headbands! I made a fewe for Christmas gifts and when I asked my daughters to try them on for size, they wouldn’t give them back 🙂 Guess I’ll have to make more. I’ll send pictures when I get a chance — they’re super cute (and cheap, and easy). Thanks so much for the tutorial!
16. Kristie | November 28, 2007 at 5:00 pm
That’s “few”. I do know how to spell!
17. Christiana | November 29, 2007 at 7:32 am
I just made approx. 20 of this for little gifts for my daughters’ friends both the narrow and wide. They look great! One trick my seamtress mom taught me years ago when making a tube is to sew a piece of string or yarn inbetween the right sides (you have to sew one end shut with the string and then leave it hanging out the other end then just open the sewn end with a ripper once right sides are out) then you just pull on the string helping it turn. Thanks for posting this pattern! Great fun! I loved the fabrics you used!
18. Karyn | June 13, 2011 at 3:03 am
That is a fantastic idea! Thanks for sharing!
19. Connie | November 10, 2011 at 5:15 pm
Great idea. I could have used this numerous times!
20. Jennifer | December 14, 2007 at 5:59 pm
Can’t wait to make these tonight for stocking stuffers, and what a great tip from Christiana!
21. I want a headband! « carrotflowers’ sewing diary | February 23, 2008 at 12:56 am
[…] for the 3rd week in a row, as I always do. So before I embark on anything else, I am going to make this headband from a tutorial which, like the pincushion, I read about on sewmamasew’s Handmade Holidays. Why do I keep […]
22. carrotflowers » Blog Archive » I want a headband! | March 3, 2008 at 5:31 pm
[…] for the 3rd week in a row, as I always do. So before I embark on anything else, I am going to make this headband from a tutorial which, like the pincushion, I read about on sewmamasew’s Handmade Holidays. Why do I keep […]
23. Fabric Band at eager little mind | March 16, 2008 at 6:34 pm
[…] I’ve mentioned before that I have an abnormally large head for a woman. Really. I do. Especially since I’m only 5′3″. I have a really difficult time finding women’s hats that fit, and even in men’s hats I have to get a large or extra large size. With my recent disaster of a haircut I wanted to get a few thick headbands to wear as it grows out. But since my head is big they are usually too small and pinch and give me headaches. So I decided to make a few fabric bands. Last night I took some of my scrap fabric and tried out foofanagle’s best band ever tutorial. […]
24. Tori | March 21, 2008 at 1:27 pm
I did this tut today and it was totally easy. I’m so excited about these, I’m going to make a lot for my daughter and some of her friends. Thanks for a wonderful tutorial!!
25. » Blog Archive » Nice Blog | April 6, 2008 at 3:18 pm
[…] would like to make these head bands for my girls. Since I have lots of scraps from skirts and things that I’ve made, I think […]
26. janice | April 8, 2008 at 11:59 pm
I can not wait to use these!! wowo I am so glad i found your blog! you ROCK!!
27. stine | April 13, 2008 at 1:44 pm
fantastic, thanks so much for sharing! i just tried it and it works perfectly. it’s really fast, too. needed only about 20 minutes to make one. now i know how to use all those slim, long fabric leftovers… 🙂
28. Throwback Thursday: Headbands | May 15, 2008 at 7:28 pm
[…] June, Foofanangle featured a great headband tutorial. (You might have seen this on Sew, Mama, Sew during Handmade Holidays […]
29. Christina Magliano | June 16, 2008 at 3:07 pm
AWESOME, AWESOME, AWESOME…oh yeah did I say AWESOME!!!
Thank you sooo much for sharing this tut, my SD wears these all the time and the ones we bought a year ago are starting to get worn out she wears them so much…Now I can make her up some new ones!!
Thank you again, great tut!!!
30. Missie | July 4, 2008 at 2:09 pm
This was so quick & easy! I’ve just been folding & tying scraps of fabric around my head, but the knots got uncomfortable. I had some red white & blue star fabric & just whipped one up this morning for the July 4th festivities. Thanks so much!
31. Jamie | July 12, 2008 at 2:24 am
Thank-you for making this tutorial! I have been wanting to make this kind of headband for awhile now. Your instructions are great!
32. Hope | August 5, 2008 at 5:39 pm
I can’t wait to try this. Thanks for sharing!
33. Free hair bow instructions online - Page 2 - Hip Girl Boutique Free Hair Bow Instructions--Learn how to make hairbows and hair clips, FREE! | August 12, 2008 at 7:52 pm
[…] hair bow instructions online If you like sewing headbands, I found this amazing instruction ::Best Band Ever:: Enjoy […]
34. Fabric headbands - Hip Girl Boutique Free Hair Bow Instructions--Learn how to make hairbows and hair clips, FREE! | September 17, 2008 at 2:29 am
[…] other tutorials for who ever is interested Likeflowersandbutterflies: Reversible headband tutorial ::Best Band Ever:: __________________ Leslie mommy to Kadyn (6.5) Ethan (4) and Little miss Hannah (2) […]
35. Cheryl | October 21, 2008 at 5:38 pm
Where do I find the pattern?
36. Sew, Mama, Sew controls all that I see « HodgePodge | November 14, 2008 at 9:53 pm
[…] Cape Tute – for my little superhero Toddler Smock Overdress Pattern – for my next door neighbor Hairband Tute – for every girl on my list! Covered Crate Tute – what a great idea for cute storage and […]
37. Done with DD! :) « HodgePodge | November 23, 2008 at 3:43 pm
[…] firsts (and seconds). Overall I think I did a great job, and it looks cute: And I made her a headband that looks nice with it, too: Her main present this year is going to be updating her library. She […]
38. Christine | December 2, 2008 at 4:10 am
This was so fun, and super easy. Your tutorial is right on the mark! Thanks for sharing!
39. 40+ Gifts Tutorials For Her! « Everything Your Mama Made & More | December 7, 2008 at 9:22 pm
[…] Headband […]
40. Making Hair Accessories | three14creations | December 16, 2008 at 4:56 pm
[…] Headband Fabric Reversible Headband Felt Covered Barrettes […]
41. smarie | December 24, 2008 at 8:31 pm
So, cool thank you the tutorial! You rock!
42. Headbands for the wee-one « Living in the Fine Print | January 7, 2009 at 12:11 am
[…] 6, 2009 in Sewing | Tags: headband, making headband, Sewing, sewing headband I found a pattern for headbands that a couple of folks had raved about and thought I’d give it a try. I recently cut my […]
43. Jenny | February 23, 2009 at 12:12 am
I’m making these with my girlfriends tomorrow, I’m so excited! Thanks for the tutorial!
44. carrotflowers » Blog Archive » I have a headband! | April 11, 2009 at 2:34 pm
[…] Source: this tutorial, as previously […]
45. Emily | May 4, 2009 at 11:04 pm
Love these! I changed it slightly to use an hairband instead of the elastic. Thanks for the template – that was really helpful.
46. Laurie | May 5, 2009 at 1:48 pm
This looks wonderful….I am fixing to try one right now!!!!! You seem to teach so great…I have the hardest time reading and ‘understanding’ directions…but you are great!!! Thanks for sharing a great pattern. Contact me, I have something fun to share as well, coasters, so easy you can make 50 in a day!!!! great gifts
47. headbands | June 4, 2009 at 5:12 am
Oh you’re so crafty! Awesome. Love the headband, you did a great job! Thanks a lot!
48. Addy | June 15, 2009 at 2:45 pm
Nice. I’ve always wanted to try to make one of these.
Addy @ ‘babygiftsandshowers.com
49. aubrey | June 26, 2009 at 2:32 am
Thanks for posting this! I have made quite a few for my daughter now….she loves them clipped with a bow or flower to them and it makes for a quick, super cute hair style…I just made one for her today for the 4th of July! Thanks! Thanks! I love how easy these are, too!
50. Headband Sewing Tutorial | Picking Up Threads | August 30, 2009 at 3:57 am
[…] What: How to Sew a Headband […]
51. Erin | September 19, 2009 at 12:46 pm
My big head and I thank you! 🙂 I just got my sewing maching last week and start lessons in a few days. This is going to be my first “me” project. Thank you so much!
52. fiandneez | October 9, 2009 at 8:06 pm
Thank you for sharing.
53. Bookmarks for today: More Sewing Links | wonderment | November 13, 2009 at 4:29 pm
[…] Best Band Ever – So, I have a large head, apparently, because it’s hard to find hats that fit, and headbands always give me headaches. One solution? Make your own. Genius! […]
54. Di | November 28, 2009 at 12:12 am
thanks!! xmas done.
55. 36+ Gifts Tutorials For Her! « Everything Your Mama Made & More | December 8, 2009 at 9:31 pm
[…] Headband […]
56. Headband Sewing Tutorial | February 23, 2010 at 3:12 am
[…] What: How to Sew a Headband […]
57. robert | March 4, 2010 at 7:41 am
I have worked for an office furniture company for many years . Being in the manufacturing of office screens and chairs we end up with bin loads of off cut Fabric ! Now I have something to do with those troublesome off cuts! Cheers!
58. Kim @ seven thirty three | March 26, 2010 at 1:24 pm
Just wanted to let you know that I featured this on Fun Feature Friday at seven thirty three!
59. Jennifer | April 25, 2010 at 10:34 pm
OMG! I just finished up my first one and I’m addicted I’m going to make some more in millions of colors! Thanks for the AWESOME tutorial!!
60. Sarah | May 4, 2010 at 4:03 pm
Thank you for the awesome tutorial. I just made one in about 20 minutes! Too cute!
61. Chiara Handmade | May 14, 2010 at 1:34 pm
thank you very much for this beautiful tutorial!
http://chiarahandmade.blogspot.com/2010/05/tutorial-dal-web-fasce-per-capelli.html
62. Kate and Neil’s Awesome Website » Productive weekend | October 25, 2010 at 1:32 am
[…] a tutorial. Except I didn’t use […]
63. amanda | March 24, 2011 at 11:55 pm
Love this, but seriously impossible to turn the tube of fabric the right way. I even tried the string trick and not helping! Any tips?
64. Jenny | April 1, 2011 at 3:28 pm
I made my first one last night (and cut out 6 more!). Boy that turning was a real pain though. My fingertips are still sore!! I think the narrow one is easier to turn because that wide one has the small ends. I think on the others that I will just iron them and stitch them right sides out.
65. brittny | May 3, 2011 at 12:15 am
i thought so too but thats ok
66. pedilu | April 6, 2011 at 10:17 am
Yay! I finally did it! :.D
It was hard to turn. But I’m very happy with the result!
67. brittny | May 3, 2011 at 12:14 am
this is great
68. Erin Kelly | June 15, 2011 at 1:43 pm
Thanks for the awesome tut! I am making a smaller version of this today for my daughter to match a dress. How simple yet PRETTY. Great job and thanks again 😀
69. the newest style « vision. documentary. faith. photography. culture | August 16, 2011 at 2:59 am
[…] to Foofanagle I now have a cute new style of headbands being made. With the help of my mom in buying a sewing […]
70. Completed Projects – July and August « Mama the Reader | September 7, 2011 at 6:56 pm
[…] made a few headbands using this easy tutorial. It was pretty much impossible to self-direct a photo that looks decent, but you get the […]
71. Fete Making (week 2,3 and 4) « harrysdesk | October 13, 2011 at 11:48 am
[…] Hair-bands have been cut out (thanks Laura)…. sorry no accompanying picture. we are using this pattern […]
72. MAKE IT! Stocking Stuffers — The Titus 2 Homemaker | October 29, 2011 at 1:44 pm
[…] {bow1, bow2, covered clips, crocheted hairband, fabric headband, another […]
73. Connie | November 11, 2011 at 5:13 am
I just made one of these today! Perfect! I have a nine month old and lost a lot of hair during and shortly after the pregnancy. Now all that hair is growing back and driving my crazy as fly-aways. It’s like growing your bangs out but all over my head. I have to wear my hair up because of little fingers which makes the new growth show even worse. This band is perfect for that, plus it easily fits underneath my glasses over my ears. Most bands combined with my glasses was very uncomfortable right behind my ears. Thanks for a great template and tutorial! Next project will be a couple of holiday ones! Can’t wait!
74. Crissy | January 3, 2012 at 7:10 am
I just made 3 of these today. So easy and they look adorable on my girls. Thanks for the tutorial!!
75. Kris | February 28, 2012 at 2:47 am
Just made one for my daughter, zebra/cheetah reversable, at 14 yrs old, she loves it! It fits perfectly! I will be making more in the next few days for her friends.
76. Lin | February 29, 2012 at 9:51 pm
I just made the wide one and love it! I left an opening along the widest part to do the turning and it worked out well — just closed it up when doing the topstitching. I was worried about sizing since headbands are usually too tight on me, but wound up with only 2 1/2″ of elastic between the fabric edges for a perfect non-headache-inducing fit. Thanks for the great idea/tutorial!
77. Butterscotch Tabby | March 12, 2012 at 2:15 pm
Reblogged this on Butterscotch Tabby.
78. Natasha | March 13, 2012 at 4:16 pm
I would love to buy some of these too… I love headbands but they seem to always slip off my head. Please contact me if you sell them – nfgandhi@hotmail.com
79. Bronwen Rivenwood | March 13, 2012 at 10:48 pm
Just made the narrow version and so far I am very pleased… it’s very comfortable and so far isn’t slipping off my head as most headbands do. Thank you!
80. her_accessory | March 14, 2012 at 2:23 pm
I absolutely love headbands! I’m not much of a sewer though, so like a few mentioned above, I’d prefer to purchase them.
81. Jenny Whitehead | April 20, 2012 at 4:02 am
WOW! I am super frustrated. I made the wide one and maybe the interfacing I used is too bulky but there is NO way I can get it to turn right side out!! Grrr…. Giving up 😦 These are so cute. Maybe I’ll give it a whirl some other day w/o interfacing and I am sure that will be much easier to turn right side out. I have no patience so that does’t help either.
82. foofanagle | April 20, 2012 at 4:48 am
I’m sorry you’re having trouble with the turning. It is the toughest part!
A few thoughts… Definitely try a lighter weight interfacing or no interfacing Cut the ends of the band pieces slightly bigger at the ends. It won’t make a big difference in how the band fits but could help with the turning Did you try the safety pin trick to turn?
I hope you can make it work next time you try!
Cheers, Suzanne
83. willtree | May 2, 2012 at 3:45 pm
Reblogged this on WillowSaurus and commented:
Im very excited to make these tomorrow!
84. Saturday Sewing « For His Workmanship | June 26, 2012 at 4:33 am
[…] patterns and so today decided to try one out. I got this one from foofangle blog. It is called Best Band Ever . It went together really easy and I really like it. I like how it is wide across the top but […]
85. If i can sew, sew can you! {pt II} 5 easy projects for beginners to sew… | Sew Chic and Unique | June 26, 2012 at 7:16 pm
[…] project that is quick to make and one that you could show off easily is headbands! {Foofanagle} says its the Best Band […]
86. Tons of Tutes- His & Hers | July 1, 2012 at 1:02 am
[…] Variation 2- Double Breasted Coat Hooded Wrap Coat Double-Breasted WaistcoatMisc Cozy Shawl Foo Fangle’s Headband Heather Bailey’s Hooray for HeadbandsApronsFree Patterns Shower Cap A Feathered […]
87. Farrah | December 7, 2012 at 5:25 am
Hey I made the slim versions for my preschoolers stockings and they turned out perfectly – thank you so much!
88. MAKE IT! Stocking Stuffers | January 5, 2013 at 3:31 am
[…] {bow1, bow2, covered clips, crocheted hairband, fabric headband, another […]
89. Snow Day Flannel Headband for infant, toddler, or even an adult « Grassfed Mama | January 18, 2013 at 12:41 pm
[…] a few ideas together to create the one I made. Here is the band tutorial I basically followed : band tutorial and the flower was made following this tutorial: […]
90. Buy Sell Swap | February 8, 2013 at 6:40 am
[…] Details: https://foofanagle.wordpress.com/2007/06/12/best-band-ever/ […]
91. Christmas ensemble, part 1: My top and skirt | Kathleen Sews | April 18, 2013 at 6:23 am
[…] you can barely see it in the photo, I also made a reversible headband using this “Best Band Ever” tutorial – they are really great headbands and I’m going to try to size them […]
92. wolfqueen1013 | May 22, 2013 at 6:26 pm
Cute! I may do a lot of other stuff (like jewelry) so this is really easy for me and this is such a relief to find a pattern like this. THAK YOU SOOO MUCH!
93. November 22 ~ Fun for Hair | Sew,Mama,Sew! Blog | | June 2, 2013 at 3:19 pm
[…] Band Ever Suzanne’s Best Band Ever Tutorial on her blog, foofanagle, has two versions and a template to […]
94. Ana | July 14, 2013 at 1:35 am
Just made one of each using your patterns! Turned pretty good considering I don’t sew very often. You’ve inspired me to do these for my three curly haired girls. Love it!
95. Cloth Book and Headband | Simply Sewing | September 19, 2013 at 1:43 am
[…] patterns and so today decided to try one out. I got this one from foofangle blog. It is called Best Band Ever . It went together really easy and I really like it. I like how it is wide across the top but […]
96. Snow Day Flannel Headband for infant, toddler, or even an adult - Grassfed Mama | December 8, 2013 at 3:48 pm
[…] a few ideas together to create the one I made. Here is the band tutorial I basically followed : band tutorial and the flower was made following this tutorial: […]
97. Kristi | January 29, 2014 at 3:09 am
Very cute but turning it was a bear! Made such a mess thankfully I have long hair and it covers the mess. Any help to turn it right side out??
98. Snow Day Flannel Headband for infant, toddler, or even an adult :: Grassfed Mama | April 2, 2014 at 10:19 pm
[…] a few ideas together to create the one I made. Here is the band tutorial I basically followed : band tutorial and the flower was made following this tutorial: […]
99. Rustic Acres | April 10, 2014 at 6:50 pm
Great little tutorial! Easy to make and uses up smaller pieces of fabric. If you use a large safety pin to turn it is not a big at all. I will have to say this was WAY to big for my head. I’m going to try a shorter piece of elastic.
100. Tons of Tutes- His & Hers | My great WordPress blog | August 13, 2014 at 6:41 pm
[…] Foo Fangle’s Headband […]
101. Barbara | August 20, 2014 at 12:32 am
I made this and my daughter (the runner) loved it.
102. Bethany | December 10, 2014 at 3:55 am
Is the pattern printed on 8 1/2 by 11 paper?
103. Naaisels voor de Stiefgeschwister | Ma vie en vert | June 3, 2015 at 8:24 pm
[…] maakte… – een haarband, uit een oud hoeslaken. Saai wit, maar dat is omdat ik het nog helemaal ga benaaien met witte […]
104. frankie | September 1, 2015 at 3:41 am
I think this is one of the most important info for me. And i’m glad reading your article. But should remark on few general things, The website style is perfect, the articles is really nice : D. Good job, cheers
105. Un atkal plānojam… | Zem Mango Koka | December 10, 2015 at 3:43 am
[…] te vēl viena matu lentas varianta apraksts – Foofanagle matu lenta. Šo var nēsāt no abām pusēm. Es gan laikam to pliko gumija daļu kaut kādi apsegtu ar […]
106. Rosangela | May 7, 2016 at 6:37 pm
Looks great! Thanks for sharing it.
107. Amarabia Ibeawuchi | August 6, 2016 at 8:46 pm
Thank you so much Susan, this is beautiful. And it’s also practicable. I will surely do some! Thanks again!
108. 105 DIY Headbands Your Friends Will Want to Steal from You | October 4, 2016 at 11:49 pm
[…] Wide and Narrow Cloth Headband Tutorials […]
109. November 22 ~ Fun for Hair | Sew Mama Sew | February 9, 2017 at 7:29 pm
[…] Band Ever Suzanne’s Best Band Ever Tutorial on her blog, foofanagle, has two versions and a template to […]
110. Jennifer Cook | November 8, 2017 at 11:08 pm
Is there a template for the headband that I could print
111. sahm2girls | January 10, 2018 at 5:31 pm
It’s there, it’s just easy to miss. The first line under materials says Templates: Headband Tutorial Template. That’s actually a link to the pdf of the template. Click it and print.
112. ‚was für den Kopf – pedilu | June 14, 2018 at 9:02 am
[…] getan. Gestern war es endlich so weit. Nach einer Anleitung von foofanagle entstand gestern Abend auf die Schnelle dieses […]
113. 20+ Free headband sewing tutorials for women - Swoodson Says | June 19, 2018 at 2:31 am
[…] Tapered woven headband sewing pattern from Foofanagle […]
114. 'was für den Kopf - pedilu | June 19, 2018 at 11:21 am
[…] getan. Gestern war es endlich so weit. Nach einer Anleitung von foofanagle entstand gestern Abend auf die Schnelle dieses […]
115. Doreen | August 7, 2019 at 1:51 pm
Hello, thank you for sharing your beautiful tutorial. I’m wondering how you would adjust this so that the elastic is not in direct contact with the hair. Im worried that the friction will pull out the hair in that area. Any suggestions?
116. melvraych | December 19, 2021 at 8:54 pm
http://ch7gram.com/foomosufea melvraych mygeena a30b5ac58e