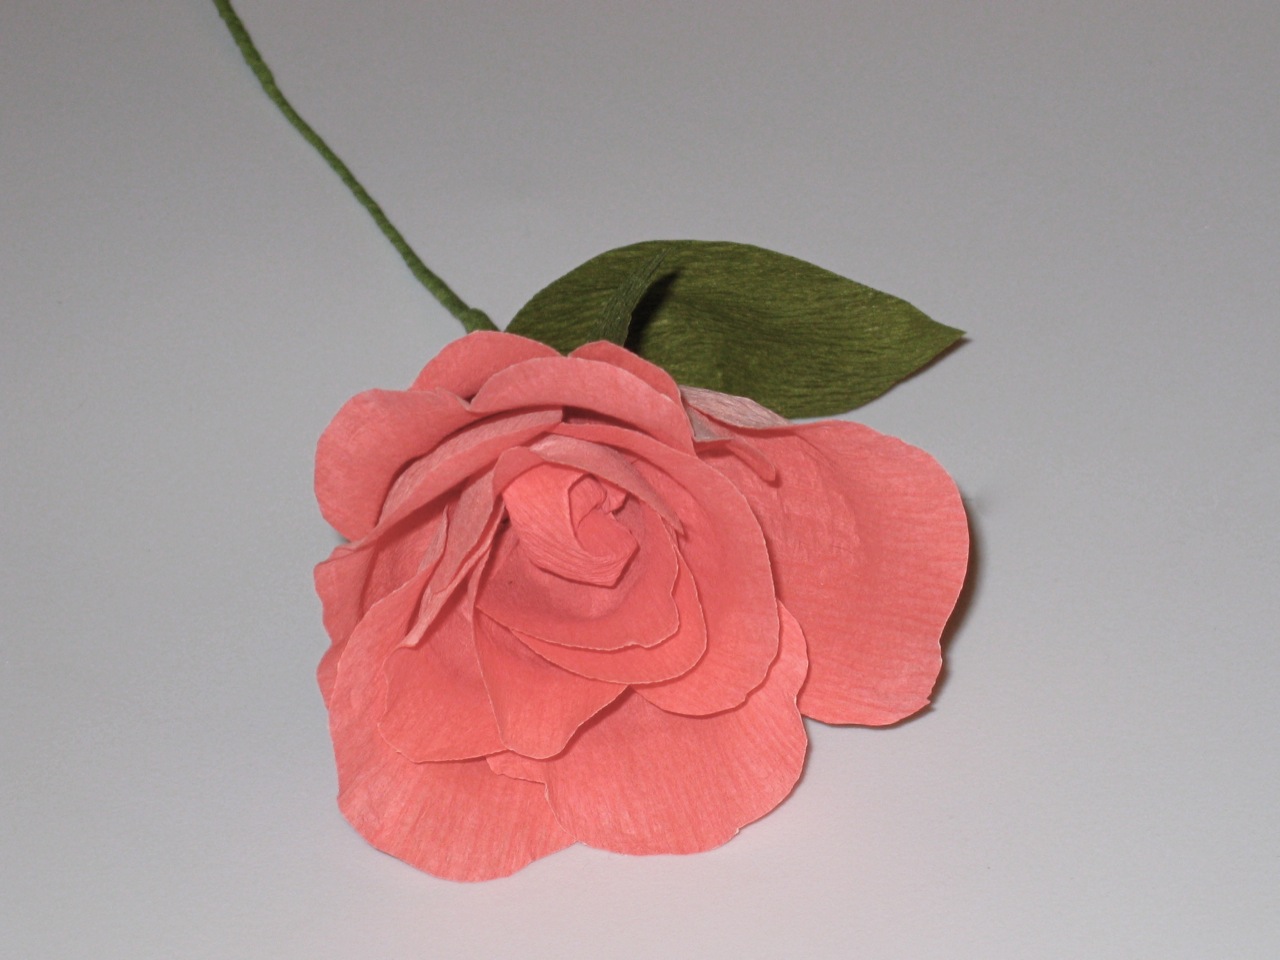
::Crepe Paper Roses::
February 13, 2009 at 2:42 am 30 comments
And now for something completely different…
I’m drawn to almost any craft that involves a somewhat realistic looking flower as a final product. Hence my foray into French Beaded Flowers (fun…but takes FOREVER and expensive). A quicker, much less expensive, and very gratifying craft is making Crepe Paper Flowers (CPF.)
Making crepe flowers is a classic craft that was popular in the 1950’s. I’ve been surprised by the total lack of good online tutorials or instructions on how to make these pretty flowers. Thanks to eBay, I’ve manage to create a nice little collection of old instruction books on the art. Martha Stewart Crafts also had CPF kits going for awhile, but they appear to be discontinued. I want to spread the joy of the craft with others so I thought I’d create a few tutorials for y’all.
There are two primary methods for making CPF: single petal and continuous petal. Carnations and Daisies are made using the continuous petal method in which you cut long long strips of petals. Peonies, Morning Glories, Tulips, and Roses are made using the single petal method in which you cut individual petals.
We’ll talk about the continuous petal method another day because with Valentine’s Day looming, it’s all about ROSES!

Tutorial below. Let me know if something is unclear. Enjoy!
(Forgive the terrible quality of the photos. I tossed these instructions together in between night feedings for the baby.)
Crepe Paper Roses :: A down and dirty tutorial
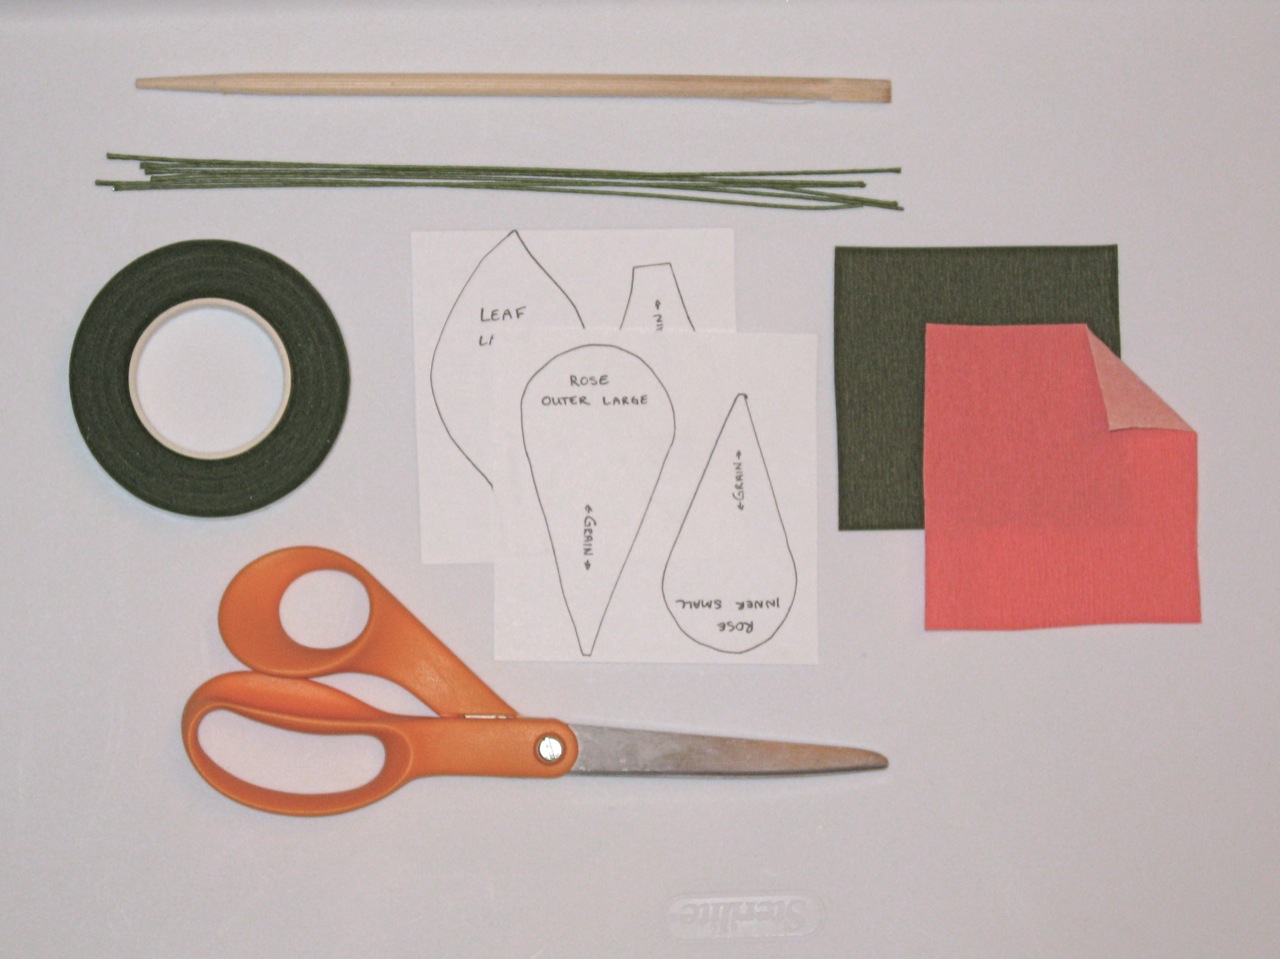
Materials
Florist’s tape
18 gauge cloth-wrapped florist’s wire (check out your craft store’s silk flower department.)
2-ply or Double Sided Crepe paper* in petal and leaf colors
TEMPLATES
Scissors
Chopstick, pencil or some thin dowel (Optional for shaping)
*2-ply crepe is really tough to find. See the Notes section below for tips on this.
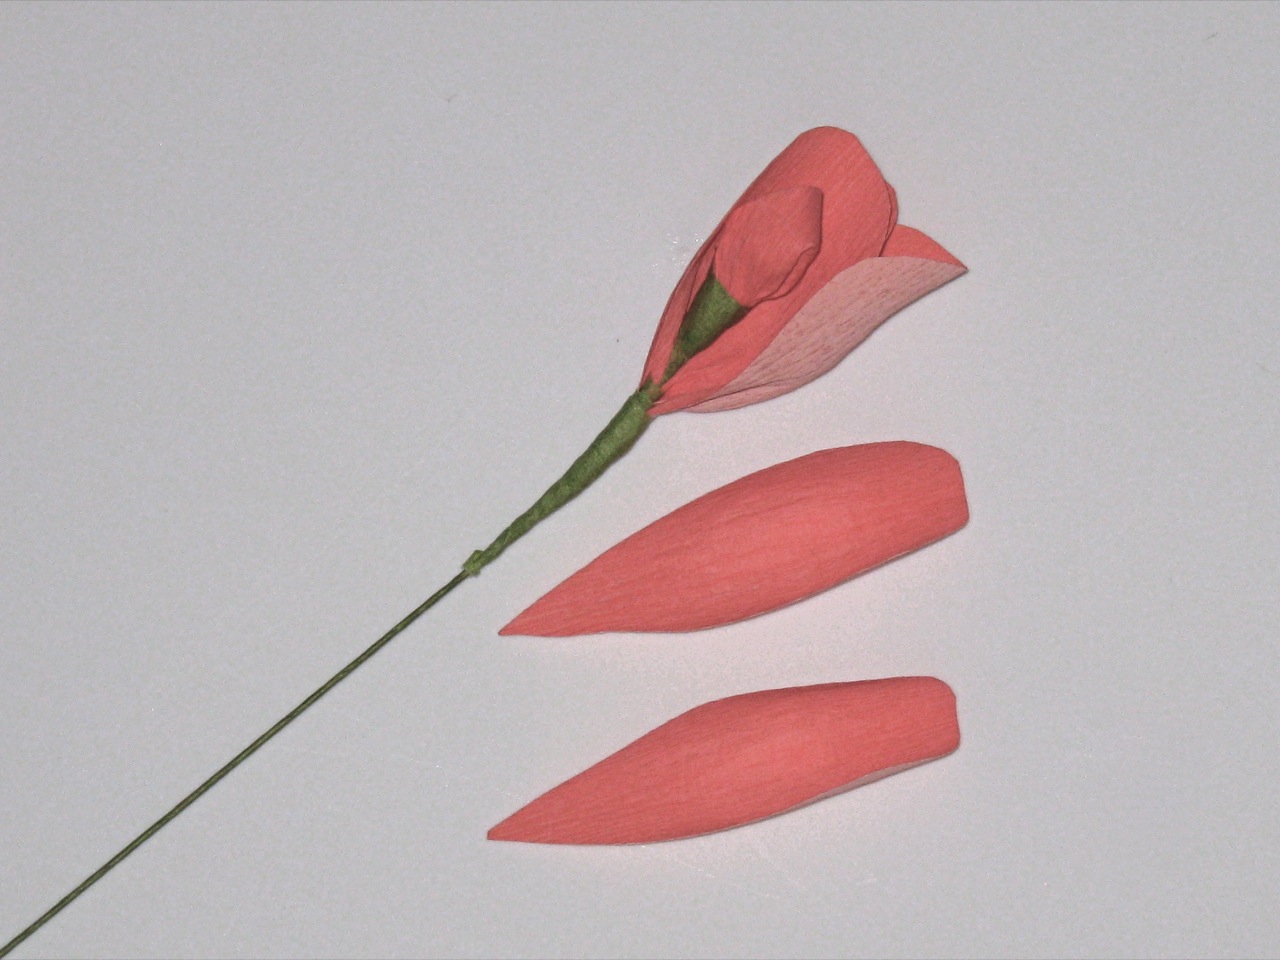
To make a single rose you’ll need:
5 small petals (approx)
7 large petals (approx)
2 leaves (approx)
1 stamen and stem
1 calyx (not pictured since I’m a dork and forgot)

Create Stamen and Stem
- Cut a 12” length of 18 gauge florist’s wire
- Cut a 3” square of crepe from your petal color
- Fold in half into a triangle
- Fold the two side corners down to the center corner. Slightly overlap the sides to form a shape that looks something like a closed bud.
- Twist/crumple the corners together trying to maintain the bud shape.
- Wrap bottom of bud tightly to the wire with florist’s tape. The bud should not slide up and down after it’s taped on.
Create Petals
- Cut petals from crepe paper making sure the grain of the crepe runs vertically with the length of the petal. You’ll want approximately 5 small petals and 7 large petals for a single rose.
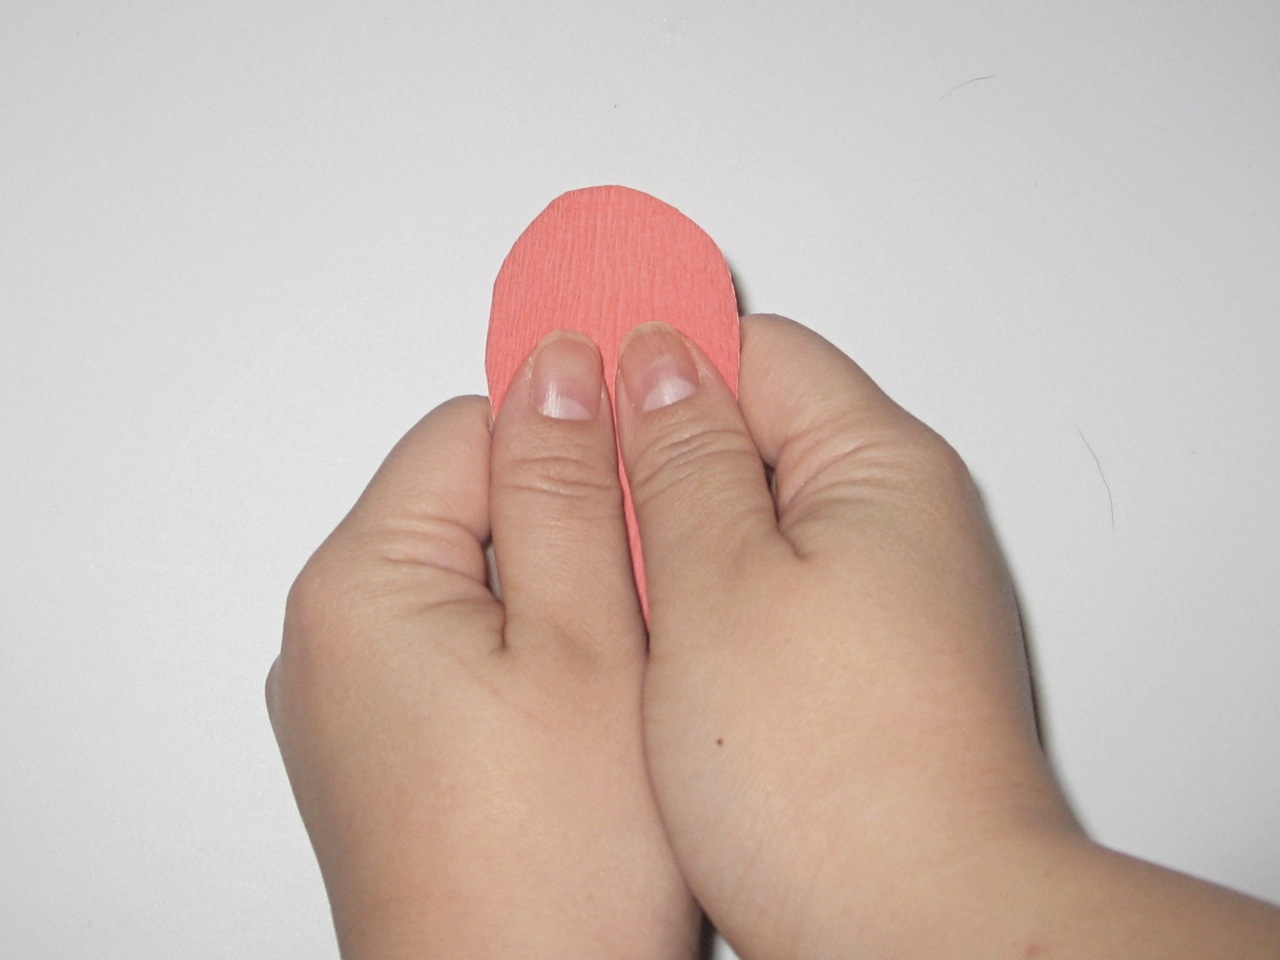
- Cup petals just below the vertical center point. Do this by holding the petal in both hands with your thumbs in the center of the petal. Gently stretch the crepe outwards using your thumbs to create a little curve/cup shape.
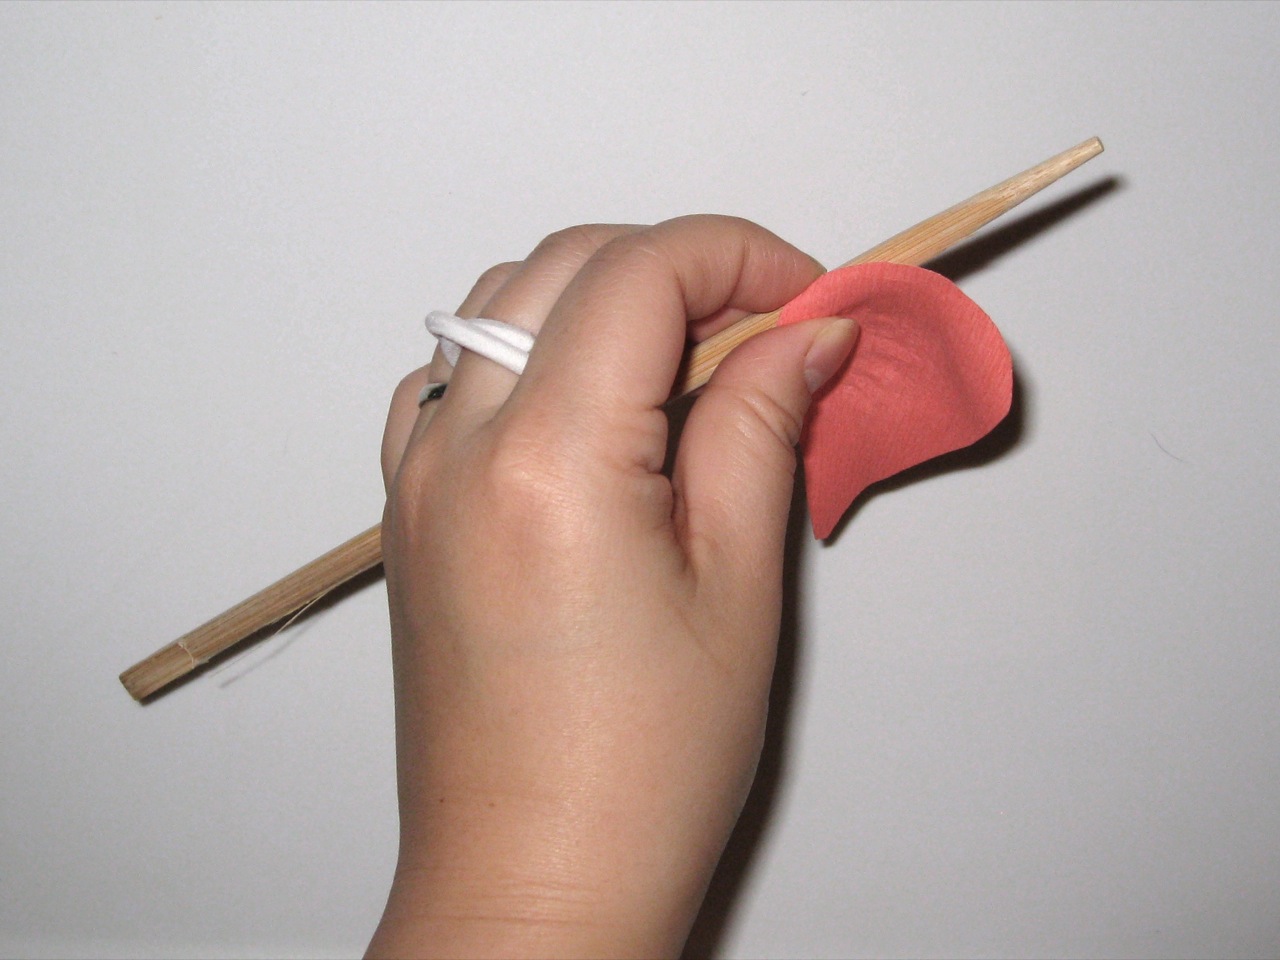
- On the large petals, gently curl upper edges of petals outward (around a chopstick or toothpick) to create a more realistic petal shape. Don’t worry about being too precise…you can adjust it a little later.
- Pleat base of each petal. Inner petals may need a double pleat. Outer petals may only need a single pleat. You can play with this a little as you assemble the flower so that the petals lay as you like them. Neatness does not count here. A little pinch should do ya.
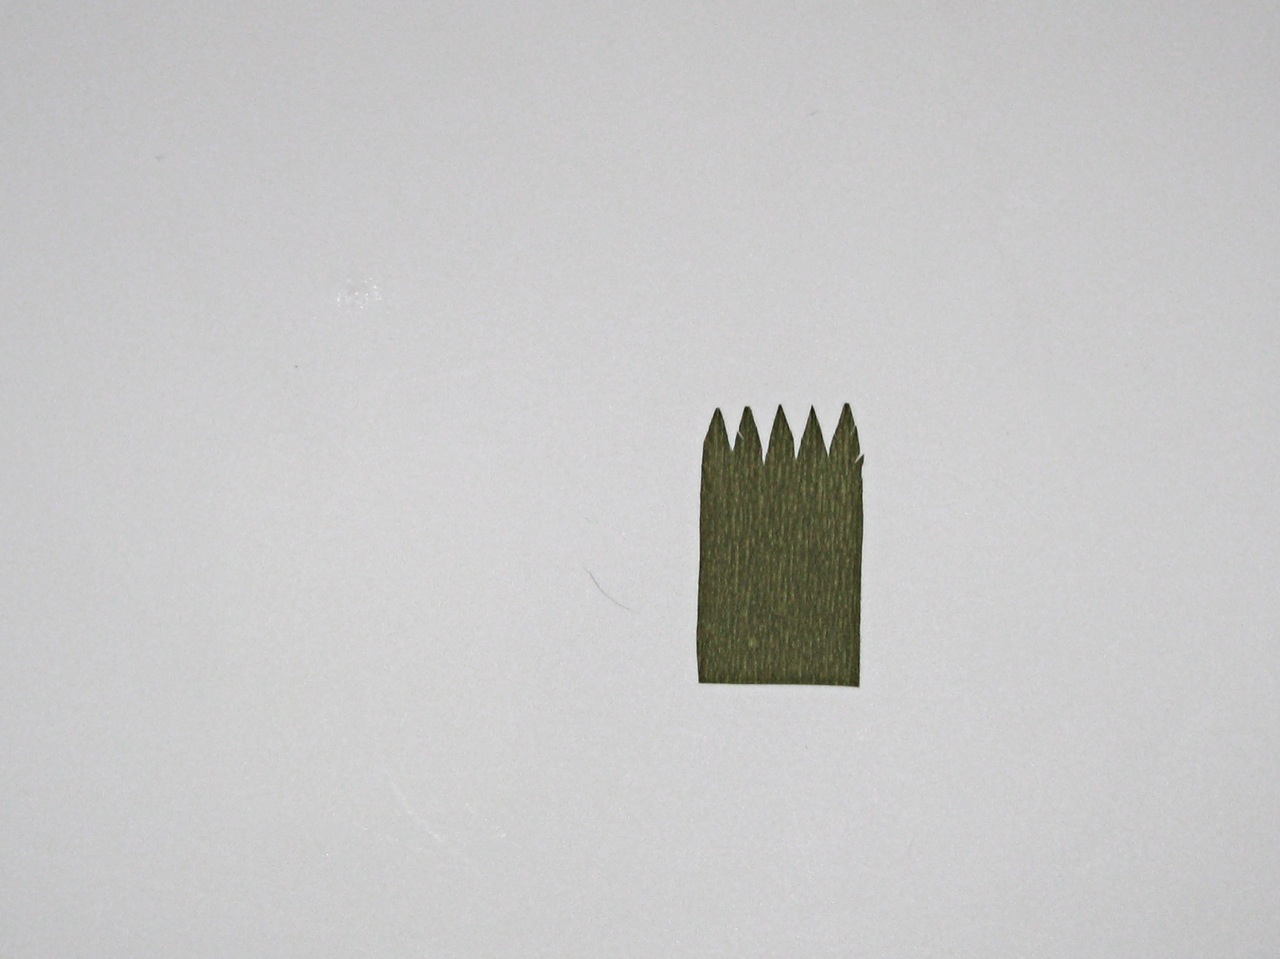
Create Leaves
The quick and dirty way to make leaves is the non-wired way. Quick instructions for wired leaves (which are a little more versatile and much more positionable but take longer) are below.
- Cut leaves (I like 2-3 per rose) from the leaf colored crepe paper using the leaf template. Set aside for assembly.
Note: The template has a smooth outline. To make more realistic rose leaves, deckle/notch the sides of the leaf. You can use fancy deckle scissors if you have them or just take tiny snips using fine tip scissors.
Alternatively, you can make wired leaves. I find the best way to do this is:
- Cut two ovals of crepe (per leaf) that are slightly larger than the leaf template.
- Glue (spray glue works best, but you can use a white craft glue applied around the edges and down the center of the leaf too) the two ovals together with a short length (3-6”) of wire between the layers.
- After the glue has set, cut your leaf shape from the oval being careful to center the wire so that it runs from the bottom center of the leaf.
- Cut the end of the leaf wire to the final length you desire and attach to stem.
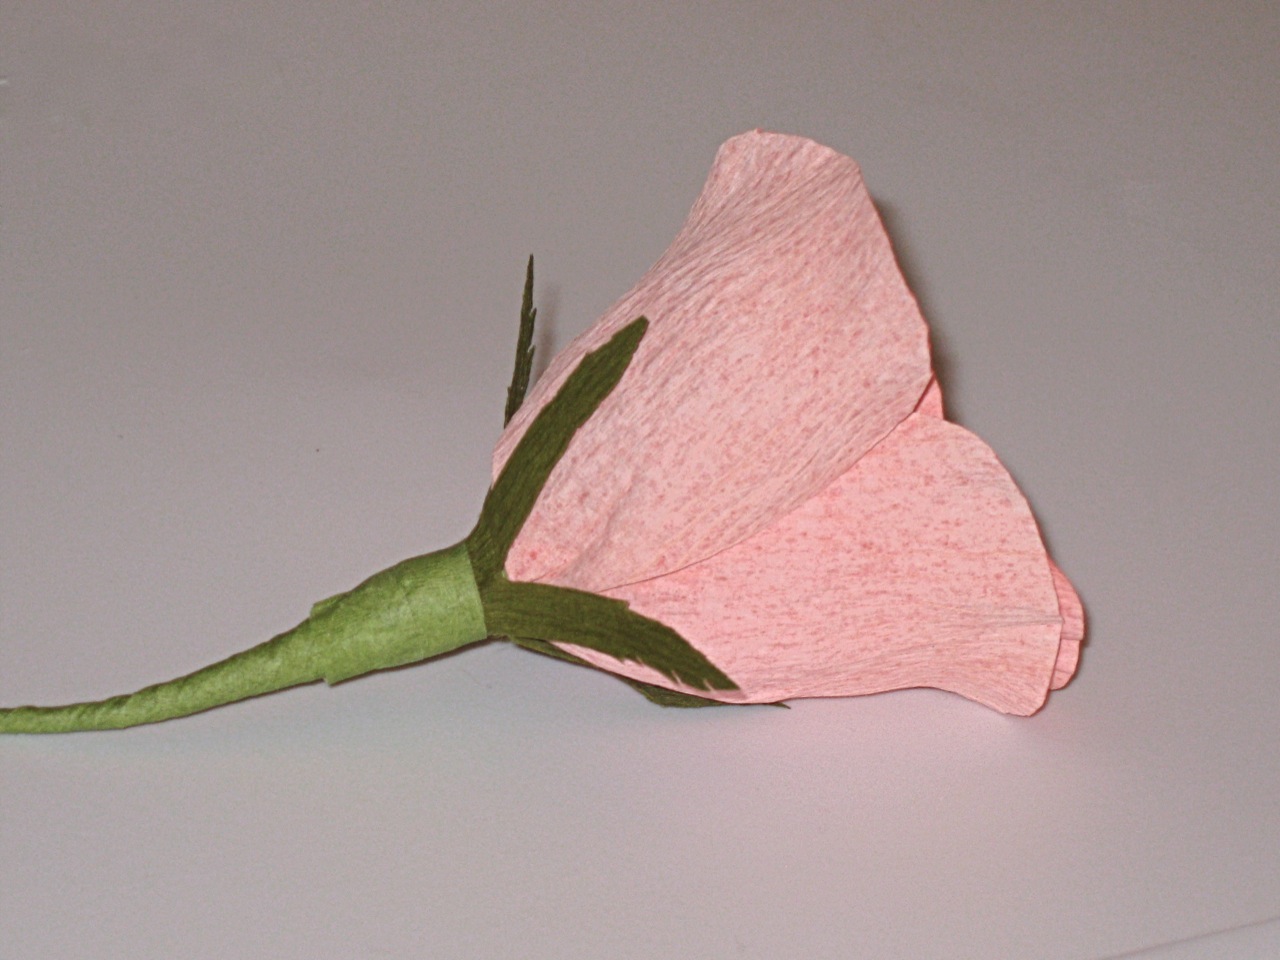
Create Calyx
- Cut a calyx from the template and set aside for assembly. You only need one per rose.
- To make a more realistic calyx, there are texture lines on the template. Cut the calyx out first and then go back with fine tip scissors and take little snips to make the texture cuts.
IMPORTANT! After cutting out the calyx, gently stretch the base of the calyx out. Then snip between the calyx blades from the top down to 0.5 inches from the calyx base. This makes the calyx long enough to wrap around the whole rose and creates the separate blades of the calyx. It’s poorly illustrated on the template. Sorry about that!
Assemble Flower
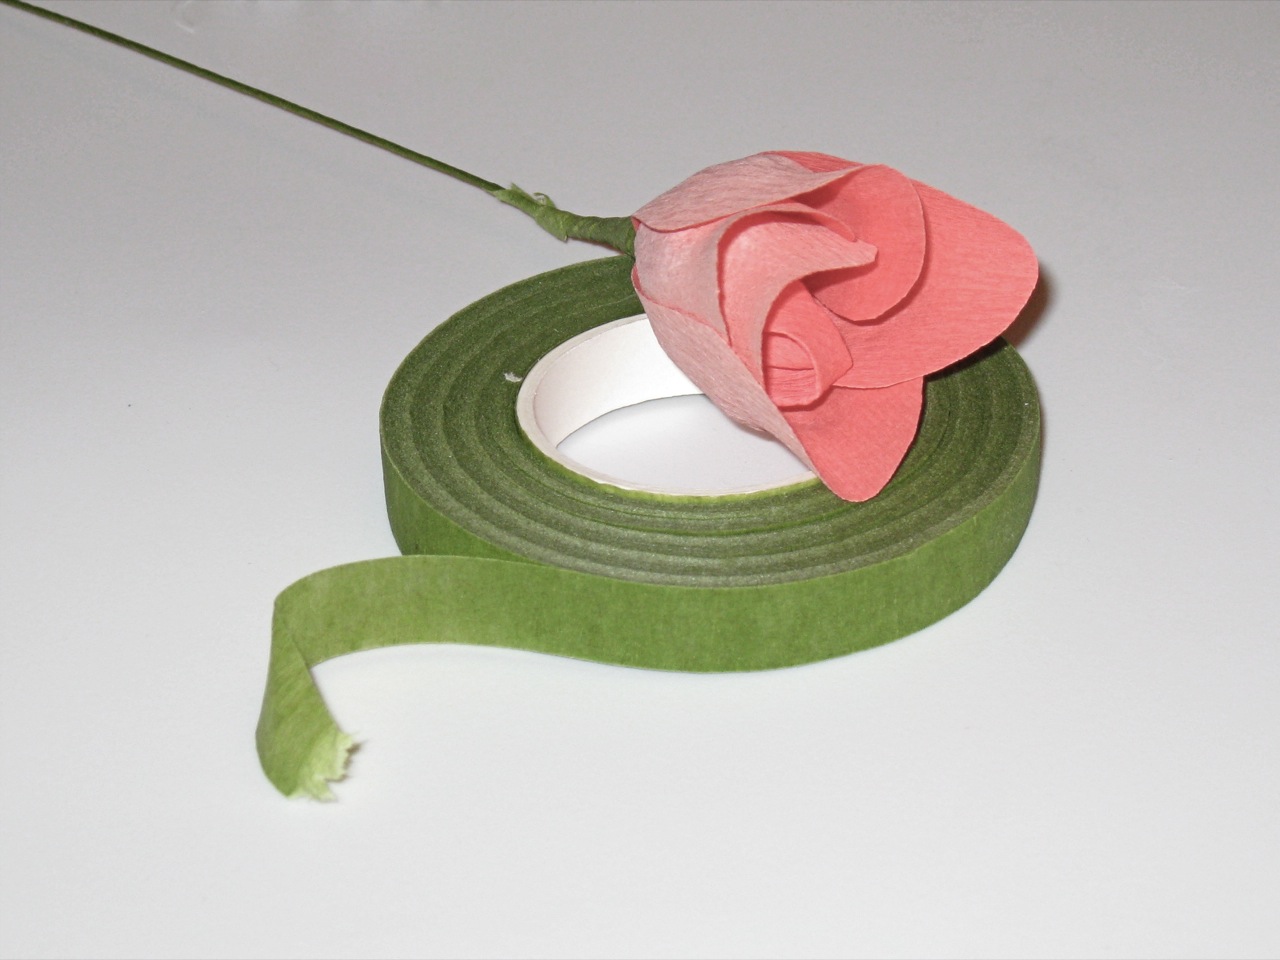
- To attach flower pieces to the stamen, use florist’s tape. Stretch the tape to make it sticky.
- Hold the new flower piece against the stamen/stem where you want it. Wrap along the bottom of the piece with florist’s tape. Catch enough of the bottom of the flower piece to make sure it’s secure. Wrap the tape down along the stem for a little bit to secure the piece to the stem. Also, remember, this build of up of florist’s tape is creating the base bulb of the rose.
- Attach petals to stamen, starting with the small petals, using the florist’s tape. Start lower on the stamen and curl the first petals around it somewhat tightly. Raise the next round of petals a little bit higher. Petals should overlap slightly as you attach each one. Think of a real rose and how the petals overlap. That’s what you’re duplicating.
- As you’re assembling, look at the rose overall. Try to position the petals evenly around the stamen, but you don’t have to get all crazy about it. You can even it out a little bit more after it’s all assembled. And perfection is so overdone.
- After all petals are attached, wrap calyx around base of the rose. (Did you remember to stretch and snip it first?) Wrap tightly around the rose base with florist’s tape to secure.
- Now is the time to use the florist’s tape to ensure the bottom of the rose looks pretty. Just make sure the tape is nice and smooth and the “bulb” at the base of the rose is plump and even. And check your stem. Are all your tape ends wrapped up and secure? You may want to do one coat of florists tape down the length of the stem before you attach your leaves.
- Position the bottom of the leaf against the stem where desired. Use floral tape to secure the end of the leaf to the stem. Apply as many leaves as desired.
You’re almost done… Take a final look at your rose. Now’s a great time to add a little extra stretch to your outer petals to get them the way you want them. You can stretch the edges outward to add a little flare or make a petal a bit wider. Just fiddle with it until you’re happy.
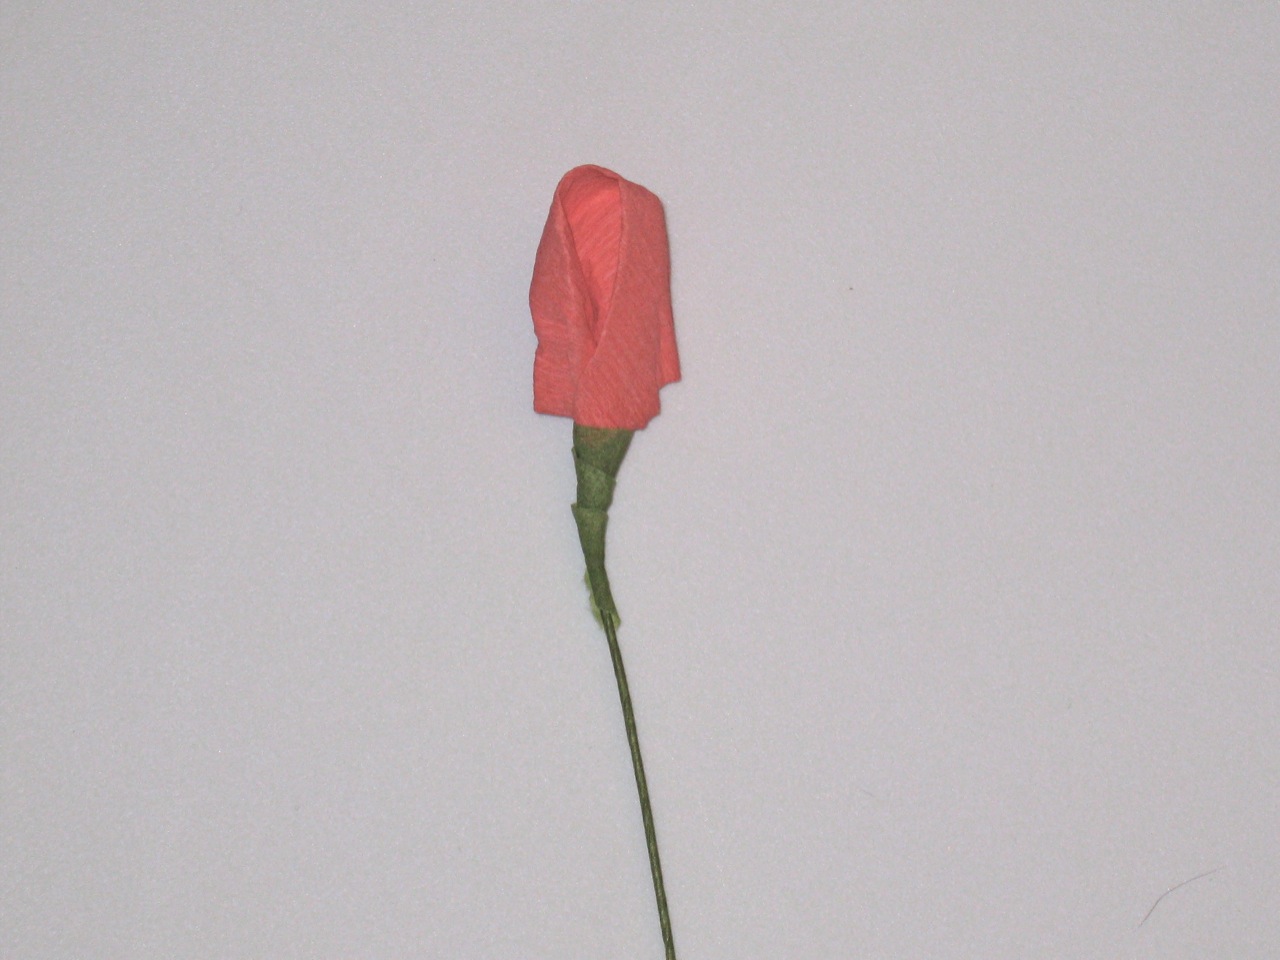
Ta-da!
Notes/Tips
- Remember, you can stretch crepe more, but you can never re-crease it. So err on the side of caution as you’re cupping the petals.
- I find it easiest to work with 6-8” lengths of florist’s tape. If you finish attaching a piece and you have excess, just tear it off and rub the end of the tape to the stem to make it blend in. Pre-stretch a couple of inches before you attach your piece, and then stretch the tape as you go using that extra pulling tension to ensure the tape is nice and tight.
- Play with the crepe a bit to get a feel for how it stretches and moulds as you work it. You get slightly different looks when your fingers are close together versus far apart when you stretch the crepe. I like to take tiny stretches along the outer petals to create little “ripples” of texture. The petals and leaves will also respond to you stretching from one side of the piece versus the opposite side. You can add a more realistic look to your petals if you stretch the edges outward instead of inward.
- You do not have to use 2-ply crepe, but it makes a huge difference in the final product. 2-ply crepe is sturdy, better approximates the thickness of a rose petal, is less likely to tear, and holds shaping better than single-ply crepe. That said, if you can’t find 2-ply crepe or don’t want to make it, you can use single-ply. Just be aware that it won’t look as nice as 2-ply crepe.
- 2-ply (double sided) crepe paper is hideously difficult to find. For a brief while, Martha Stewart Crafts sold it in flower colored packs at Michael’s craft stores. But it appears to be discontinued. WAHHHH. Very rarely some of this crepe (new and vintage) pops up on eBay. But it’s very inconsistent.
- To make your own 2-ply crepe paper cut manageable sized pieces of crepe (I tried using huge pieces once and it was a hot mess!) Use a spray adhesive on one piece. A light but complete coat is enough. Then press the second piece of crepe against the sticky side of the first piece. Make sure the grain lines match!!! Let dry and voila! Double-sided crepe. You can use the same color crepe for both sides or play with two different colors to create some really pretty combos.
- About vintage crepe. I have a small collection of this classic paper. It’s fun to work with but a few warnings about buying it (if you can find it.) Watch out for a musty smell. No one wants roses that smell like your Grandma’s attic. Old crepe isn’t necessarily a hot commodity and isn’t often stored properly. This means it’s often “dry” (ie a loss in elasticity). Vintage crepe is often yellowed too. Sometimes this is limited to the edges of the fold, but the yellowing/fading can certainly spread throughout the whole fold of paper. So buyer beware. Honestly, unless you’re a vintage fanatic, I suggest you just find new 2-ply crepe or make your own.
- Sometimes single-ply crepe is better for a particular flower. Thin petal flowers or flowers with a LOT of petals are often better served by single-ply crepe. Dahlias and Peonies are great examples of this. I’ll try to get a tutorial together for those soon.
- Florist’s tape comes in different colors. Keep an eye out for the darker and lighter green varieties to give you some flexibility. If your cloth-wrapped wire doesn’t match your florist’s tape, just wrap it all the way down the stem with the florist’s tape. If you can’t find cloth-wrapped wire, just buy some regular craft wire and wrap it with the florist’s tape.
- Have fun with this! Here’s your chance to have roses of any color you want. (Well, any color of crepe you can find.) Make 2-ply crepe out of two different colors.
- Reduce or enlarge the templates for alternative sizes. I’ve made lots of miniature roses that are super cute.
- WARNING! Crepe paper FADES. If you set a bouquet out in direct sunlight, it will fade and become drab. There are some mentions of a wax treatment that protect the paper in my old books but heck if I’d try that. There may also be a spray product that could be applied, but I haven’t researched that on my own. I just wanted to make sure you were aware of the fading.
Entry filed under: Crafty, Paper Crafts.
30 Comments Add your own
Leave a comment
Trackback this post | Subscribe to the comments via RSS Feed

1. Stephanie | February 13, 2009 at 2:38 pm
So pretty!
2. sherri s. | February 25, 2009 at 5:23 am
Wow, so amazingly life-like…I love it! Thanks for the tute. I have a couple of Dennison pamphlets around here somewhere; I also have a couple of vintage packs of unopened crepe paper. Hmmm…
3. gregpeckfan | March 9, 2009 at 6:12 pm
My grandmother and her sisters sold crepe paper flowers (she said only Dennison’s crepe was good enough) door-to-door to raise money for their family, during the late part of the 1930s. She was probably 10 – 12. I would love to make paper dahlias for my wedding, I look forward to a tutorial on that!
4. Melanie | May 3, 2009 at 4:38 am
Any idea when you’ll have other tutorials up for other flower types?
5. Forever Flowers « Our Kodachrome Wedding | November 1, 2009 at 4:36 am
[…] did a little research online and found tutorials for making crepe paper flowers at foofanagle, Castle in the Air, and Martha Stewart crafts. I got enough confidence from these tutorials that I […]
6. Bev | January 21, 2010 at 4:16 pm
Luvly rose! Plucked up the confidence to make 2 ply cp, thanks and great work. :o)
7. cat | January 26, 2010 at 4:09 am
beautiful!! made the 2 ply crepe paper, wasn’t TOO difficult… just finished the first rose and it was so enjoyable to make that now i’m POSITIVE i’m going to make a ton of these for my wedding (which is in 8 months) rather than purchase real ones… i like these better anyway because they’ll last forever (or at least longer than real ones) they’re just as pretty, i can make them in the colors i want, and they go well with the vintage theme. thanks for the great tutorial!
8. cat | February 18, 2010 at 4:16 am
Look look! I used your webpage! I hope you don’t mind… see the pretty roses I made for my wedding? Thank you thank you for the wonderful tutorial!
9. Forever Flowers | Weddingbee | February 26, 2010 at 7:24 pm
[…] did a little research online and found tutorials for making crepe paper flowers at foofanagle, Castle in the Air, and Martha Stewart crafts. I got enough confidence from these tutorials that I […]
10. Napkin Rings a Billion and One Ways | Weddingbee | March 25, 2010 at 10:47 pm
[…] source […]
11. Napkin Rings a Billion and One Ways – 41th Edition | Learn Marketing | March 26, 2010 at 9:08 pm
[…] source […]
12. Napkin Rings a Billion and One Ways – 79th Edition | Learn Marketing | March 28, 2010 at 8:13 pm
[…] source […]
13. noah | July 17, 2010 at 2:23 am
Really thanks a lot for these wonderful tutorials. I seldom leave comments for people but your tutorial is just fantastic. I have just made my first rose and am planning to make a few for my girl friend as birthday present. 🙂
14. apply for VA loan | July 27, 2010 at 7:44 pm
Great article.Will use to teach kids.
15. Margaret Ivory | January 12, 2011 at 5:30 am
Very lovely. Thanks for the tutorial.
16. nelda | February 25, 2011 at 2:14 am
I had been told my grandmother made paper roses with crepe pape during the depression to sell. Ialways evnvisioned themthe exact way your instructions show. Thank you
17. Des Fleurs en Papier Crépon tout partout dans mon Mariage ! | Glam' Papeterie | March 2, 2011 at 8:05 am
[…] Encore des roses ! […]
18. Donna aAken | March 2, 2011 at 7:30 pm
Looks so real. Loved them. Any idea where to find double sided crepe paper?
19. foofanagle | March 2, 2011 at 8:02 pm
Hi Donna! Thank you for the compliment and question. Check out this post for more info about crepe. https://foofanagle.wordpress.com/2009/02/17/more-about-crepe-and-flowers/
I hope you enjoyed the tutorial. I have intentions to do one about the strip method for daisies and dahlias…but have been bogged down by real life lately.
Cheers! suzanne
20. Donna aiken | March 18, 2011 at 9:14 pm
Wher do I finf double sided crepe paper? I ‘m having a hard time finding a magenta shade. Help
21. foofanagle | March 18, 2011 at 9:22 pm
Hi Donna! I created a post about that awhile back. Double sided crepe…quite frankly…is very difficult to find. I tend to just make my own. But see if the below helps.
Best wishes to you! Suzanne
22. asha | January 24, 2012 at 7:39 pm
ossam really i love it
23. pugums | March 21, 2012 at 12:39 pm
The tip about making your own double-sided crepe paper is fantastic – having never seen double sided crepe in person, I probably would never have thought of it. Thank you!!!
24. wpfanaticno2394762 | December 20, 2012 at 1:40 pm
If you do a search for Italian Crepe Paper (180 gram), you will get many more results for the type of crepe paper needed for these flowers. I hope that helps.
25. Ron Gutman | January 11, 2013 at 1:45 am
Nice tutorial and Duplex crepe paper rose! I have been doing these since I was a child. I also sculpt some very realistic flowers from a unique clay. You can see some of my work on facebook (Ron Gutman)…click on photos. Or my website: http://www.rongutmanstudio.com.
26. Sally Wheeler | February 8, 2013 at 5:55 pm
Lovely tutorial, but can you tell me the sizes of the petals, please? I’m not good at judging these things and would really appreciate it.
27. foofanagle | February 8, 2013 at 6:18 pm
Hi Sally! There is a link to the petal templates in the blog post (in the Materials section.) You can print it out on your printer at home which will give you the exact size/shape of the petals and leaves I use. Look for the green text that says “TEMPLATES” (it’s not obvious it’s a clickable link.)
Cheers! Suzanne
28. FF: Paper flowers | ReveDreams.com | May 2, 2014 at 8:02 pm
[…] with petal shapes cut into it as on The Bride’s Cafe, or individual cut out petals as on Foofanagle. With the right kind of crepe, you can even make them huge, as on Martha Stewart (alternate […]
29. Paper Flowers From Books | All Crafts | February 14, 2015 at 5:14 pm
[…] source: […]
30. Idee con la carta crespa: non solo fiori · Pane, Amore e Creatività | July 25, 2019 at 2:14 pm
[…] Una rosa ::Crepe Paper Roses:: […]